|
Last Time, we covered the camera and lighting for pens - hard
light and soft light. So let’s begin...
The light cone
This is exactly what it sounds like, a continuous cone of translucent material
you light from the outside and shoot down into. You can make this out of almost
any semi-ridge material be it paper, translum (a photographic product) or heavier
vellum. Simply shape the material into a cone and tape the seam. Presto! A light
cone. Just make sure the top end of your cone is large enough to place the lens
through otherwise you’ll have a nice funnel with no place to shoot through!
The materials you need to construct this are available from most good art supply
stores. This is also the purpose of the lampshade so frequently suggested -- same
principle, just already made and readily available for around $5.00 to $10.00
at your local super size discount department store such as K-Mart or WalMart.
Either way you go, there you are.
The light tent
Probably the single most used tool by professionals when shooting small objects
with high reflectivity is the light tent. The name itself should tell you what
this device is all about -- a tent that you light through. Simple enough. To form
the tent you need a frame and a covering. The frame can be made using PVC pipes
and joiners, wire bent into shape, a hanging file frame or very simply your own
head. The idea is to place the pen inside the framework, place the tenting material
over the frame and shoot the pen with light coming in very diffused from the outside.
The tent will diffuse the point light source and create a very broad soft light
giving you full detail in every area of your pen. If you use one light from the
outside you will still have some contrast, but nothing like what you get using
only a single point source (hard light). When you add a second light outside the
tent the contrast drops dramatically. You can control the degree to which the
contrast drops by varying the distance of the second light and/or adding the next
accessory -- the reflector.
Reflectors
This is without a doubt the accessory that separates professional photographers
from everyone else. The reflector is used to bounce light back into certain areas
of your picture and eliminate or soften contrast and add highlights. These are
made using foam core, white poster board, silver board, aluminum foil or simply
a piece of white paper. If you want to add a long slender highlight on the side
of your pen simply cut a long reflector about twice the size of the pen and place
it just out of camera range. As you tilt the reflector you can see the effect.
Using a reflector will add a third dimension to you photograph. To support the
reflector use an “A” clamp, clothespin, sticky wax or just hold it
in place with your hand. If you want to get real fancy there are products available
with alligator clips on one end connected armature wire connected to a weighted
base designed specifically to hold reflectors and small objects. These products
are available from large photographic suppliers and some hobby shops.
No matter how you decide to light your pens nothing you can buy or construct
will ever substitute for practice. Every pen can be photographed in hundreds of
different ways. It’s up to you to find the best method and technique for
each subject.
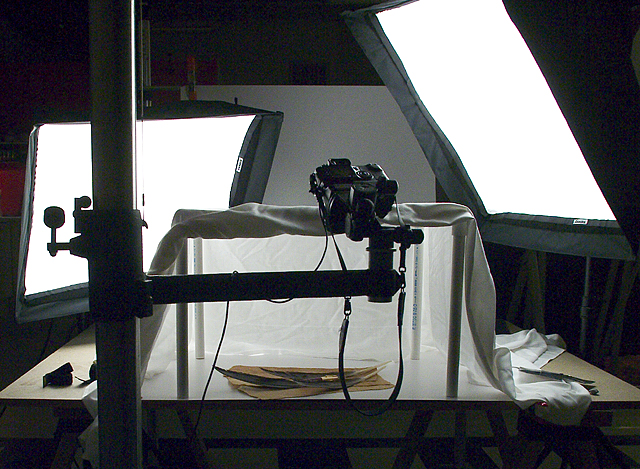
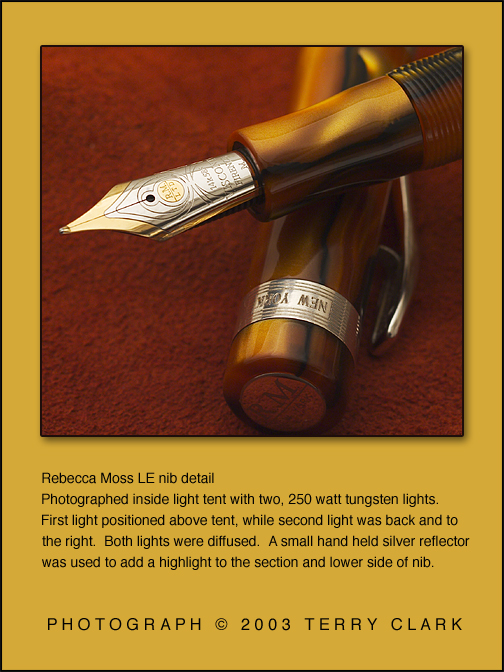
Light tent in action
Just Shoot it!
The record shot
This is the standard catalog ‘here is my pen’ photo you so often see
on the internet and in retail catalogs. It’s an identifier, nothing flashy,
just good detail throughout. Shot from high above looking down, the pen is seen
sharply against a plain (usually white) background. In photo-speak we call this
a ‘mug shot’ ala the standard police lineup picture. But don’t
get me wrong, this is an important picture and one that will identify your pen
for sales, insurance, your personal catalog or for historical record. It’s
also not as easy to create as it may sound. After you master this picture you
can begin to build step by step toward creating art photos of your pens. Remember
grasshopper, one must walk before they can fly!
To create a good record shot you will need to shoot straight down on your
pen inside a light cone (see previous on light cones) or light tent with an opening
in the top.
To support your camera at this angle the best and easiest method is to put
it on a copy stand. A copy stand is a device designed for straight down photographs
of flat art. Testrite is one manufacturer of copy stands and available from most
large camera stores around $75.00. Nobody said this would be cheap! If you have
an old enlarger you are not using, or know someone who has one, you can adapt
and build a copy stand yourself, but it may end up costing almost as much, plus
you loose the enlarger. If you have a tripod with a head extension arm that will
place the camera platform away from the legs this will also work. Many tripods
from makers such as Bogen have this accessory available. Be careful here, it may
be tempting to just hold the camera above the set and shoot down but don’t
do it. Camera shake is the leading cause of poor photos! You may think you’re
steady as a rock, but your pictures will show otherwise so always use a support.
In practice all you do is support the camera above your light cone, light
from the outside as described earlier, focus and compose your shot and bam!, you
have a nice clean record of your pen on the background of your choosing.
Next time: The "beauty shot",
exposure, white balance and the evil of flare.
Terry Clark has been a professional
photographer for more than 25 years.
He specializes in location and studio digital photography for commercial, advertising
and editorial clients worldwide. He is based in Pittsburgh, Pennsylvania and represented
in NYC by Black Star Corporate. He can be contacted at:
terryclark.photo@verizon.net.
|